A Home Inventory That Helps When You Need It
A home inventory makes possessions easier to identify and describe. Record useful details, organise clear photos and choose storage you can access when needed.
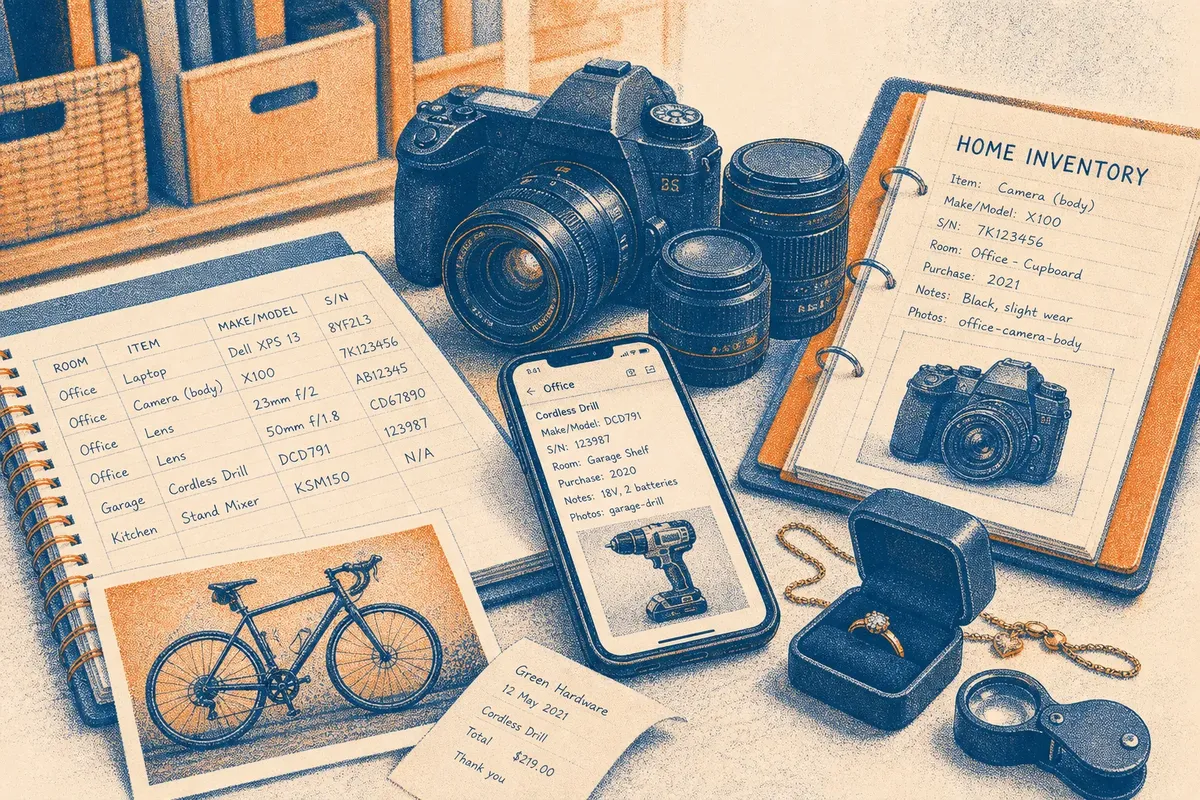
A home inventory is easier to use when you can identify an item without rummaging through drawers or relying on memory. Start with one room, note possessions that would be difficult to replace or describe, and choose a record-keeping method that suits your access and privacy needs.
The aim is a clear record, not a catalogue of every spoon. A few well-chosen notes and photographs can help you describe what you own, find a model number or update a record after a purchase.
Choose a recording method
Pick a format you are likely to maintain. A spreadsheet is easy to sort and search; a notes app is quick to update on a phone; a paper binder works without a device but needs a safe, accessible home. You can combine formats, but decide which one is the main record and how you will keep any supporting copies aligned.
Before you begin, create a clearly named folder or binder section. If you use an online service, review its access controls, account recovery options and sharing settings rather than assuming that a particular storage method is secure. Keep the inventory limited to details it needs, and consider how you would retrieve it if your usual device or account were unavailable.
- Spreadsheet: useful for sorting by room, item type or purchase information; if you will update it on a phone, check that the file is easy to open there, otherwise choose a notes app or paper record.
- Notes app: convenient for adding a short entry while walking round the house; if it does not let you organise or search entries clearly, use a spreadsheet or a consistent folder structure instead.
- Paper binder: handy for printed receipts, manuals and warranty documents; if you need the record away from home, consider a separate digital index or another retrieval plan.
- Photo folder: useful for images; if filenames alone become confusing, group them by room and match each image name to an entry in the main record.
- Shared access: useful when another household member needs the record; if a shared folder exposes details to people who do not need them, restrict access or keep sensitive notes elsewhere.
- Separate backup: useful when your primary copy is unavailable; if the backup is stored beside the main copy or depends on the same account, choose a different location or method that fits your circumstances.
Choose one main record as the source of truth. If you keep paper and digital copies, decide which one you will update first so the two versions do not drift apart.
Work room by room
Begin where useful items are concentrated, such as the sitting room, kitchen or home office. Move in a steady direction around the room, looking at shelves, cupboards and drawers rather than trying to remember everything at once.
Record possessions that are distinctive, important to your routine or hard to identify later. That might include a laptop, camera, musical instrument, bicycle, jewellery, power tools or a piece of furniture with a maker’s mark. Ordinary items can be grouped by type if an individual entry would add little.
Say you have a camera kept in a cupboard with two lenses. Start with those three items as separate entries, copy the maker and model from each visible label or manual, photograph the camera and lens markings, and note the cupboard where they are kept. The resulting record distinguishes the kit’s parts and gives you a clear location; if a model remains unreadable, mark it unknown rather than guessing.
Keep the first pass brisk. Mark uncertain details for follow-up instead of stopping to search every box; a partial, legible record is easier to improve than an unfinished attempt at perfection.
Capture useful details
For each item or sensible group, record enough information to distinguish it from similar possessions. A practical entry can include:
- Item name: check that the description identifies the object; if “tool” could mean several things, write “cordless drill”, or use the clearest visible description you can confirm.
- Room or storage place: check where the item is kept; if it has moved, update the location rather than creating a duplicate entry.
- Make and model: check the label, plate, manual or original packaging; if the model is not legible, mark it unknown and leave the field for later.
- Serial or identifying number: check whether a number is present and readable; if it is, record it, and if not, note that it is unavailable rather than inventing one.
- Distinctive features: check for colour, material, a maker’s mark or visible damage; if a feature helps distinguish the item, describe it, otherwise leave the field out.
- Purchase information: check whether you know the date or retailer; if confirmed, record it and attach a receipt when useful, otherwise leave it blank.
- Photographs or documents: check whether an image, manual or receipt helps identify the item; if it does, link it by a matching name, otherwise keep the entry simple.
Do not guess at a model number or purchase date. Write “not recorded” or leave the field blank, then return to it if you find the packaging or receipt. Clear uncertainty is more useful than a confident-looking error.
Keep descriptions plain and specific: “oak desk, two drawers, brass handles” gives a clearer picture than “nice desk”. If an object has a maker’s mark or unusual feature, note it rather than relying on a photograph alone.
Take clear photographs
Photographs add visual context, especially for items whose colour, shape or condition matters. Use a tidy background and enough light to show the whole object; then take a closer image of labels, serial numbers, maker’s marks or distinctive details.
For electronics, photograph the identifying label without unplugging or dismantling anything in an unsafe way. For jewellery or small objects, include an image of the item itself and a close-up of any inscription. Keep unrelated personal documents out of the frame.
Name images so they can be found without opening each one. A room and item name, such as “office-laptop-label”, is easier to search than a camera’s default file name. If you keep a spreadsheet, use a file link or matching item name rather than embedding large pictures in every row.
Photographs support the written record; they do not replace it. A picture of a television may show its appearance, but the model and identifying details are easier to use when typed into the inventory.
Keep records together?
Where should a home inventory be stored?
Choose a storage arrangement based on who needs access, what information the record contains and how you would retrieve it if your usual device or account were unavailable. Review the chosen service’s own privacy, sharing and recovery settings, and consider a separate copy kept in a different place or format.
Should receipts go in the inventory?
Attach or link receipts for possessions where purchase details may matter, but do not make the inventory depend on having every receipt. A note of the item, identifying details and a useful photograph can still provide a workable record.
How should I limit personal information?
Include only details that help identify or locate possessions. Review who can access the folder or binder, use the account protections offered by your chosen service, and leave out payment-card details, passwords and other information the inventory does not need.
What if I do not know an item’s model?
Record the maker, visible description and location, then mark the model as unknown. Check the item label, manual or packaging later without delaying the rest of the room.
Make it easy to find
Use a small set of consistent categories: room, item type and, if useful, ownership or storage location. In a spreadsheet, separate those details into columns so you can filter for “kitchen” or “electronics” rather than searching a paragraph of mixed notes.
Keep supporting files in a predictable structure. For example, create folders for each room and use the same item name in the inventory and image filename. Put receipts and manuals beside the matching photographs, or link to them from the entry.
Use a short index if records are split across places. A paper binder might list the general location of the digital folder; a digital index might say where a physical document is filed. Do not write passwords or access codes in that index.
Check and update records
Review the inventory when something changes: a new purchase, a sale, a repair that changes identifying details, or a move to another room. Update the relevant entry rather than making a second one that could be mistaken for a separate possession.
Choose a room and compare the record with what is actually there. Remove items you no longer own, correct locations and check that image links still open. A short, focused review is easier to keep up than a full-room reshoot every time you add something.
If you replace a device, keep the old entry only if it remains useful for your records, and mark it clearly as no longer owned. This prevents an outdated list from implying that the item is still in the house.
Start with one room
A home inventory does not have to be complete before it becomes useful. Begin with one room and a few possessions, use the same fields for each entry, and choose a storage arrangement you have checked for access, privacy and recovery.
When you next add an item, include its identifying details before the packaging disappears. A clear home inventory is easier to retrieve when its contents, filenames and access plan stay understandable to the people who may need it.
The Price Tag Is Not the Whole Cost
Compare the real cost of buying an item by weighing its purchase price against upkeep, consumables,…

Reading a Fabric Care Label Without Guesswork
Reading a fabric care label helps you decode garment instructions, inspect vulnerable details and choose a…